1.构建一个自定义的Inspector
using UnityEngine;
using System.Collocetions;
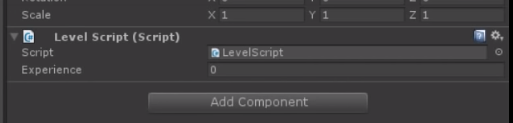
public class LevelScript : MonoBehaviour
{
public int experience;
public int Level{
get { return experience / 750; }
}
}
当前Inspector中显示的样子:
在Assets/Editor下创建脚本文件LevelScriptEditor
using UnityEngine;
using System.Collocetions;
using UnityEditor;
// 绑定对应的脚本
[CustomEditor(typeof(LevelScript))]
public class LevelScriptEditor : Editor
{
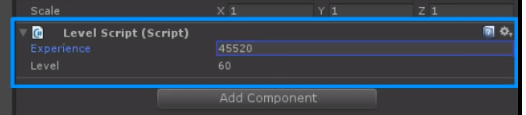
// 自定义Insperctor界面
public override void OnInsperctorGUI()
{
// 通过target获取目标脚本,进行类型的强制转换
LevelScript myLevelScript = (LevelScript)target;
// IntField可读可写
myLevelScript.experience = EditorGUILayout.IntField("Experience", myLevelScript.experience);
// LabelField仅可读
EditorGUILayout.LabelField("Level", myLevelScript.Level.ToString());
}
}
自定义Inspector后显示的样子(且随着Experience数值的变化,Level会自动做对应修改):
2.DrawDefaultInspector函数
DrawDefaultInspector函数允许我们在一个自定义的检查器中轻松地重新创建一个脚本的默认检查器。如果我们只想在脚本的检查器中添加新的项目,而不是改变当前已有的项目,那么这个函数就非常有用。
using UnityEngine;
using System.Collections;
using UnityEditor;

public class SomeScript : MonoBehaviour
{
    public int level;
    public float health;
    public Vector3 target;
}
using UnityEngine;
using System.Collections;
using UnityEditor;

[CustomEditor(typeof(SomeScript))]
public class SomeScriptEditor : Editor
{
    public override void OnInspectorGUI()
    {
        // 显示当前已有的Inspector界面
        DrawDefaultInspector();

        EditorGUILayout.HelpBox("This is a help box", MessageType.Info);
    }
}
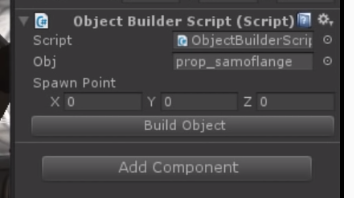
3.在自定义Inspector上添加按钮
在Unity中,我们可以在编辑器窗口中添加按钮,这样我们就可以从脚本中调用我们的函数。这样做使我们有能力专门编写脚本来改进我们的工作流程。
using UnityEngine;
using System.Collections;

public class ObjectBuilderScript : MonoBehaviour
{
    public GameObject obj;
    public Vector3 spawnPoint;


    public void BuildObject()
    {
        Instantiate(obj, spawnPoint, Quaternion.identity);
    }
}
using UnityEngine;
using System.Collections;
using UnityEditor;

[CustomEditor(typeof(ObjectBuilderScript))]
public class ObjectBuilderEditor : Editor
{
    public override void OnInspectorGUI()
    {
        DrawDefaultInspector();

        ObjectBuilderScript myScript = (ObjectBuilderScript)target;
        // 添加一个按钮,名叫Build Object
        if(GUILayout.Button("Build Object"))
        {
            // 当按钮被按下时执行
            myScript.BuildObject();
        }
    }
}
4.Unity编辑器扩展——菜单项目
Unity编辑器允许添加自定义菜单,其外观和行为与内置菜单类似。 这对于添加常用的功能非常有用,这些功能经常需要直接从编辑器UI中访问。
添加菜单项
为了在顶层工具栏上添加新的菜单,应该创建一个编辑器脚本。在脚本代码中,菜单项是作为静态方法创建的,这些方法用MenuItem属性标记。
下面是一个添加新的Tools菜单的例子,它下面有一个选项(清除所有PlayerPrefs数据)。
using UnityEngine;
using UnityEditor;

public class MenuItems
{
    [MenuItem("Tools/Clear PlayerPrefs")]
    private static void NewMenuOption()
    {
        PlayerPrefs.DeleteAll();
    }
}
这将创建一个名为 “Tools “的新编辑器菜单,并在其下放置一个名为 “Clear PlayerPrefs “的菜单项。

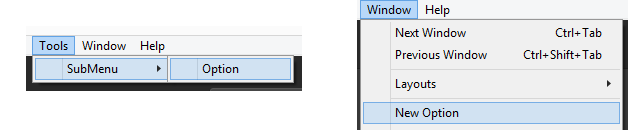
也可以在现有的菜单下创建新的菜单项(例如:在窗口菜单下),也可以创建多级菜单,以便更好地构建和组织。
using UnityEngine;
using UnityEditor;

public class MenuItemsExample
{
    // Add a new menu item under an existing menu

    [MenuItem("Window/New Option")]
    private static void NewMenuOption()
    {
    }

    // Add a menu item with multiple levels of nesting

    [MenuItem("Tools/SubMenu/Option")]
    private static void NewNestedOption()
    {
    }
}
结果如下图所示:
热键
为了让高级用户和键盘迷们更快地工作,新的菜单项可以用热键来指定或快捷键组合会自动启动它们。
这些是支持的键(也可以组合在一起)。
- % - CTRL(Windows)/CMD(OSX)。
#- Shift- & - Alt
- LEFT/RIGHT/UP/DOWN - 方向键
- F1…F2 - F键
- HOME、END、PGUP、PGDN
不属于键序的字符键通过添加下划线前缀来添加(例如:_g表示快捷键 “G”)。
热键字符组合被添加到菜单项路径的末尾,前面有一个空格),如下面的例子所示。
// Add a new menu item with hotkey CTRL-SHIFT-A

[MenuItem("Tools/New Option %#a")]
private static void NewMenuOption()
{
}

// Add a new menu item with hotkey CTRL-G

[MenuItem("Tools/Item %g")]
private static void NewNestedOption()
{
}

// Add a new menu item with hotkey G
[MenuItem("Tools/Item2 _g")]
private static void NewOptionWithHotkey()
{
}
带有热键的菜单项将显示用于启动它们的键组合。例如,上面的代码会产生这个菜单:
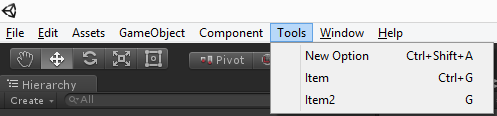
注意:没有验证重叠的热键!用同一个热键定义多个菜单项,结果只有一个选项被点击组合键调用。
特殊路径
可以看出,传递给MenuItem属性的路径控制了新项目将被放置在哪个顶层菜单下。
Unity有一些 “特殊” 的路径作为上下文菜单(使用右键可以访问的菜单):
- Assets——项目将在 “Assets “菜单下可用,也可以在项目视图中使用右键。
- 资产/创建——在项目视图中点击 “创建 “按钮时,项目将被列出(在添加新的类型时很有用,可以添加到项目中)。
- CONTEXT/ComponentName——在给定组件的检查器内右键单击即可获得项目。
下面是一些如何使用这些特殊路径的例子:
// Add a new menu item that is accessed by right-clicking on an asset in the project view

[MenuItem("Assets/Load Additive Scene")]
private static void LoadAdditiveScene()
{
    var selected = Selection.activeObject;
    EditorApplication.OpenSceneAdditive(AssetDatabase.GetAssetPath(selected));
}

// Adding a new menu item under Assets/Create

[MenuItem("Assets/Create/Add Configuration")]
private static void AddConfig()
{
    // Create and add a new ScriptableObject for storing configuration
}

// Add a new menu item that is accessed by right-clicking inside the RigidBody component

[MenuItem("CONTEXT/Rigidbody/New Option")]
private static void NewOpenForRigidBody()
{
}
这段代码的结果就是这些新的菜单选项:
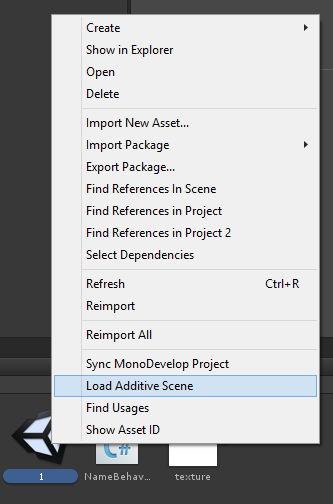
Assets(项目视图)右键单击菜单
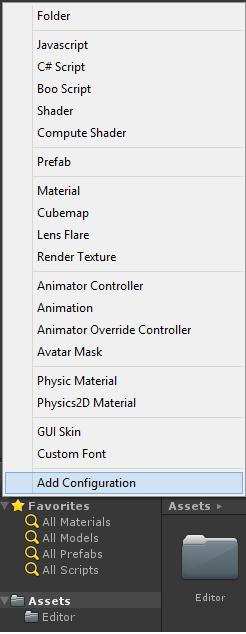
Assets的 “创建 (Create)”按钮中的新选项
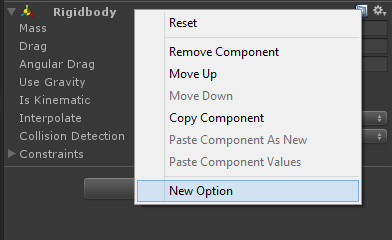
为RigidBody组件添加新的上下文菜单选项
验证
有些菜单项只有在特定的上下文中才有意义,否则就不应该出现。根据菜单项的使用环境来启用/禁用菜单项是通过添加验证方法来实现的。
验证方法是静态方法,用MenuItem属性标记,向验证参数传递true。
验证方法的菜单路径应该与所验证的菜单相同,并且应该返回一个布尔值来判断菜单项是否处于活动状态。
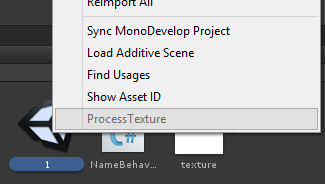
例如,验证方法可用于仅在项目视图下为Texture资产添加右键菜单:
[MenuItem("Assets/ProcessTexture")]
private static void DoSomethingWithTexture()
{
}

// Note that we pass the same path, and also pass "true" to the second argument.
[MenuItem("Assets/ProcessTexture", true)]
private static bool NewMenuOptionValidation()
{
    // This returns true when the selected object is a Texture2D (the menu item will be disabled otherwise).
    return Selection.activeObject.GetType() == typeof(Texture2D);
}
当在项目视图中右击的东西不是texture时,菜单项选项将被禁用(灰色):
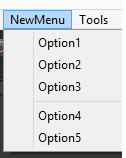
用优先权控制秩序
优先级是一个可以分配给菜单项的数字(传递给MenuItem属性),它可以控制根菜单下的菜单项的排序。
菜单项也会根据其分配的优先级以50为增量自动分组:
[MenuItem("NewMenu/Option1", false, 1)]
private static void NewMenuOption()
{
}

[MenuItem("NewMenu/Option2", false, 2)]
private static void NewMenuOption2()
{
}

[MenuItem("NewMenu/Option3", false, 3)]
private static void NewMenuOption3()
{
}

[MenuItem("NewMenu/Option4", false, 51)]
private static void NewMenuOption4()
{
}

[MenuItem("NewMenu/Option5", false, 52)]
private static void NewMenuOption5()
{
}
该代码示例的结果是,根据分配的优先级,菜单中有2组项目:
如果需要在现有的Unity菜单下添加和组织菜单项,需要做一点 “猜测 “工作,因为大多数内置的菜单项都使用优先级。另一种选择是使用Reflector等工具,查看Unity内部代码(如UnityEditor.CreateBuildInWindows)的源代码,这些代码负责在编辑器中创建一些菜单。
相关课程
以下是一些与添加新菜单项相关的额外类的列表。
MenuCommand
当在检查器中添加一个新的菜单项时(如上所述,使用 “CONTEXT/Component”),有时需要获得对实际组件的引用(例如:修改其数据)。
这可以通过在定义新菜单项的静态方法中添加一个MenuCommand参数来实现:
[MenuItem("CONTEXT/RigidBody/New Option")]
private static void NewMenuOption(MenuCommand menuCommand)
{
    // The RigidBody component can be extracted from the menu command using the context field.
    var rigid = menuCommand.context as RigidBody;
}
从代码示例中可以看出,当调用菜单项时,可以使用上下文字段访问作为其上下文的组件。
ContextMenu
这个属性允许定义上下文菜单项。这与使用MenuItem属性定义一个路径以 “CONTEXT/… “开头的方法的工作原理完全相同。
不同的是,使用这个属性,你可以为一个给定的组件定义默认的上下文菜单,而使用MenuItem方法,你可以 “扩展 “其他组件的菜单(例如:作为引擎一部分的默认组件)。
例子:一个组件暴露了一个上下文菜单选项来清除其数据。
public class NameBehaviour : MonoBehaviour
{
    public string Name;

    [ContextMenu("Reset Name")]
    private static void ResetName()
    {
        Name = string.Empty;
    }
}
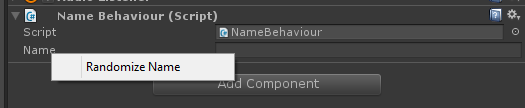
ContextMenuItem
这个属性被添加到组件(MonoBehaviour)类的字段中,以允许以更精细的分辨率添加上下文菜单。虽然上面显示的ContextMenu属性在组件级别添加了上下文菜单,但使用该属性标记字段将为单个公共字段添加右键菜单。
因为这个属性是添加到字段而不是方法,所以它接受两个参数:菜单项的显示名称和当菜单项被选中时要调用的方法(实例方法)的名称。
例子:添加一个方法来随机初始化一个组件的字段到某个状态:
public class NameBehaviour : MonoBehaviour
{
    [ContextMenuItem("Randomize Name", "Randomize")]
    public string Name;

    private void Randomize()
    {
        Name = "Some Random Name";
    }
}
当右键点击该组件的Name字段时,这段代码就会产生这个上下文菜单:
5.编辑器脚本介绍
你可以在Unity内部使用编辑器脚本,通过少量的代码,可以自动使用检查器配置行为的一些更繁琐的方面,并提供配置更改的视觉反馈。
本章节中的主要内容包括:
- 如何在检查器中暴露方法
- 如何使用Handles创建自定义Gizmos
- 如何使用字段属性来定制检查器
简单的技术入门
我们从一个基本的projectile类开始,让用户分配到刚体场(rigidbody field),rigidbody提供物理行为。然后我们将扩展这个类,使其更容易使用。
public class Projectile : MonoBehaviour
{
    public Rigidbody rigidbody;
}
当你将上述组件添加到一个GameObject中时,你还需要添加一个Rigidbody组件。我们可以通过使用一个RequireComponent属性来自动实现这一点,它将在Projectile组件首次添加到GameObject中时自动添加Rigidbody组件(如果它之前不存在的话)。
[RequireComponent(typeof(Rigidbody))]
public class Projectile : MonoBehaviour
{
    public Rigidbody rigidbody;
}
让我们把它做得更好,通过自动将Rigidbody组件同时分配到rigidbody字段。我们使用Reset方法来实现这一功能,当你第一次将组件添加到GameObject时,就会调用该方法。您也可以通过在检查器中右击组件头,并选择 “Reset “菜单项来手动调用Reset方法。
[RequireComponent(typeof(Rigidbody))]
public class Projectile : MonoBehaviour
{
    public Rigidbody rigidbody;
    void Reset()
    {
        rigidbody = GetComponent<Rigidbody>();
    }
}
最后,我们可以通过使用HideInInspector属性来隐藏刚体字段,从而使inspector的GUI所占用的宝贵屏幕空间最小化。我们还可以通过在字段声明中使用new关键字来删除编辑器警告。
[RequireComponent(typeof(Rigidbody))]
public class Projectile : MonoBehaviour
{
    [HideInInspector] new public Rigidbody rigidbody;
    void Reset()
    {
        rigidbody = GetComponent<Rigidbody>();
    }
}
这些都是非常简单的技术,你可以在你的所有组件上使用,以保持干净整洁,并尽量减少配置错误。
简单的Inspector定制
下一个我们看的类是Launcher类。它实例化了一个新的Projectile,并修改了速度,使其以指定的速度向前发射。(它实际上会发射任何带有RigidBody组件的预制件。)
public class Launcher : MonoBehaviour
{
    public Rigidbody projectile;
    public Vector3 offset = Vector3.forward;
    public float velocity = 10;

    public void Fire()
    {
        var body = Instantiate(
            projectile,
            transform.TransformPoint(offset),
            transform.rotation);
        body.velocity = Vector3.forward * velocity;
    }
}
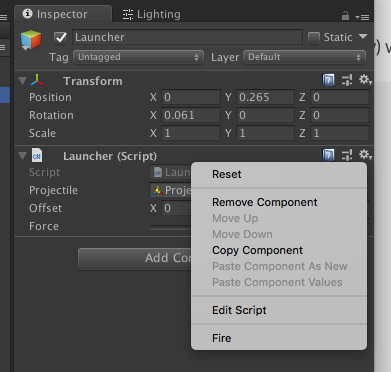
首先我们可以给 velocity字段添加一个范围(Range)属性,在检查器GUI中创建一个滑块。然后,设计者可以快速滑动这个值来实验不同的速度,或者输入一个精确的数字。我们还为Fire方法添加了一个ContextMenu属性,允许我们在inspector中通过右击组件头来运行该方法。你可以用任何方法(只要它的参数为零)来为你的组件添加编辑器功能。
public class Launcher : MonoBehaviour
{
    public Rigidbody projectile;
    public Vector3 offset = Vector3.forward;
    [Range(0, 100)] public float velocity = 10;

    [ContextMenu("Fire")]
    public void Fire()
    {
        var body = Instantiate(
            projectile,
            transform.TransformPoint(offset),
            transform.rotation);
        body.velocity = Vector3.forward * velocity;
    }
}
为了进一步推进这个例子,我们需要写一个Editor类来扩展Launcher组件的编辑器功能。该类有一个CustomEditor属性,它告诉Unity这个自定义编辑器用于哪个组件。当场景视图渲染时,会调用OnSceneGUI方法,让我们在场景视图里面绘制小部件。因为这是一个编辑器类,所以它必须在你的项目中某个名为 “Editor “的文件夹中。
using UnityEditor;

[CustomEditor(typeof(Launcher))]
public class LauncherEditor : Editor
{
    void OnSceneGUI()
    {
        var launcher = target as Launcher;
    }
}
让我们添加到OnSceneGUI方法中,这样我们就可以拥有一个小部件,允许我们在场景视图中显示和调整偏移位置。因为偏移量是相对于父变换存储的,所以我们需要使用 Transform.InverseTransformPoint 和 Transform.TransformPoint 方法将偏移量转换为世界坐标,供 Handles.PositionHandle 方法使用,并返回到本地空间以存储在偏移量字段中。
using UnityEditor;

[CustomEditor(typeof(Launcher))]
public class LauncherEditor : Editor
{
    void OnSceneGUI()
    {
        var launcher = target as Launcher;
        var transform = launcher.transform;
        launcher.offset = transform.InverseTransformPoint(
            Handles.PositionHandle(
                transform.TransformPoint(launcher.offset),
                transform.rotation));
    }
}
We can also create a custom Projectile editor class. Let’s add a damageRadius field to the Projectile class, which could be used in the game code to calculate which other GameObjects might be affected by the projectile.
我们还可以创建一个自定义的Projectile编辑器类。让我们在Projectile类中添加一个damageRadius字段,它可以在游戏代码中用来计算哪些其他GameObjects可能会受到projectile的影响。
[RequireComponent(typeof(Rigidbody))]
public class Projectile : MonoBehaviour
{
    [HideInInspector] new public Rigidbody rigidbody;
    public float damageRadius = 1;

    void Reset()
    {
        rigidbody = GetComponent<Rigidbody>();
    }
}
我们可能很想给damageRadius字段添加一个简单的Range属性,然而我们可以通过在场景视图中可视化这个字段来做得更好。我们为Projectile组件创建另一个Editor类,并使用 Handles.RadiusHandle 来可视化该字段,并允许在场景视图中调整它。
using UnityEditor;

[CustomEditor(typeof(Projectile))]
public class ProjectileEditor : Editor
{
    void OnSceneGUI()
    {
        var projectile = target as Projectile;
        var transform = projectile.transform;
        projectile.damageRadius = Handles.RadiusHandle(
            transform.rotation,
            transform.position,
            projectile.damageRadius);
    }
}
我们还应该添加一个Gizmo,这样我们就可以在场景视图中看到没有可渲染几何体的Projectile。这里我们使用了DrawGizmo属性来指定一个方法,该方法用于为Projectile类绘制gizmo。这也可以通过在Projectile类中实现OnDrawGizmos和OnDrawGizmosSelected来实现,然而更好的做法是在可能的情况下将编辑器功能与游戏功能分开,所以我们使用DrawGizmo属性来代替。
using UnityEditor;

[CustomEditor(typeof(Projectile))]
public class ProjectileEditor : Editor
{
    [DrawGizmo(GizmoType.Selected | GizmoType.NonSelected)]
    static void DrawGizmosSelected(Projectile projectile, GizmoType gizmoType)
    {
        Gizmos.DrawSphere(projectile.transform.position, 0.125f);
    }

    void OnSceneGUI()
    {
        var projectile = target as Projectile;
        var transform = projectile.transform;
        projectile.damageRadius = Handles.RadiusHandle(
            transform.rotation,
            transform.position,
            projectile.damageRadius);
    }
}
场景视图中的小工具
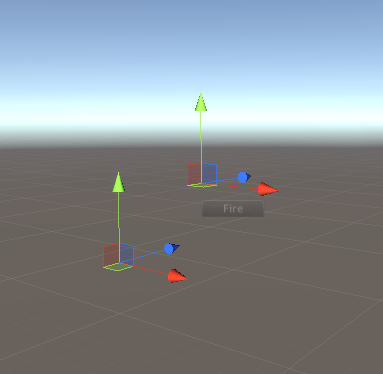
我们也可以在OnSceneGUI里面使用 Editor IMGUI 方法来创建任何一种场景视图编辑器控件。我们将在场景视图中使用一个按钮来公开Launcher组件的Fire方法。我们计算一个屏幕空间的矩形,就在我们要绘制GUI的偏移世界位置旁边。另外,我们不希望在编辑模式下调用Fire,只有在游戏时才会调用,所以我们将Fire方法的调用包裹在一个EditorGUI.DisabledGroupScope中,只有在我们处于Play模式时才会启用按钮。
using UnityEditor;

[CustomEditor(typeof(Launcher))]
public class LauncherEditor : Editor
{
    void OnSceneGUI()
    {
        var launcher = target as Launcher;
        var transform = launcher.transform;
        launcher.offset = transform.InverseTransformPoint(
            Handles.PositionHandle(
                transform.TransformPoint(launcher.offset),
                transform.rotation));
        Handles.BeginGUI();
        var rectMin = Camera.current.WorldToScreenPoint(
            launcher.transform.position +
            launcher.offset);
        var rect = new Rect();
        rect.xMin = rectMin.x;
        rect.yMin = SceneView.currentDrawingSceneView.position.height -
            rectMin.y;
        rect.width = 64;
        rect.height = 18;
        GUILayout.BeginArea(rect);
        using (new EditorGUI.DisabledGroupScope(!Application.isPlaying))
        {
            if (GUILayout.Button("Fire"))
                launcher.Fire();
        }
        GUILayout.EndArea();
        Handles.EndGUI();
    }
}
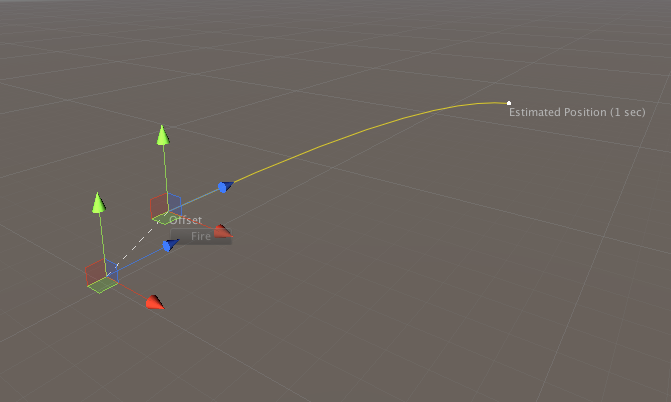
游戏设计中的物理学是很难调试的,所以我们为设计者添加一个助手,它可以显示飞行时间1秒后弹丸的估计位置。我们需要弹丸的质量来计算这个位置,因此我们在尝试计算之前检查刚体场是否为空。为了清晰起见,我们还从发射器对象到偏移位置画了一条虚线(使用 Handles.DrawDottedLine ),让设计者知道这个位置句柄修改的是偏移场,而不是变换位置。我们还可以使用Handles.Label为偏移句柄添加一个标签。
这是用一个带有DrawGizmo属性的方法来完成的,与ProjectileEditor的方法相同。我们还添加了一个 Undo.RecordObject 的调用,在 EditorGUI.ChangeCheckScope 的帮助下,我们可以在偏移量被改变时记录一个撤销操作。(如果你以前没有见过using语句,你可以在MSDN上阅读一下)。

using UnityEditor;

[CustomEditor(typeof(Launcher))]
public class LauncherEditor : Editor
{
    [DrawGizmo(GizmoType.Pickable | GizmoType.Selected)]
    static void DrawGizmosSelected(Launcher launcher, GizmoType gizmoType)
    {
        var offsetPosition = launcher.transform.position + launcher.offset;
        Handles.DrawDottedLine(launcher.transform.position, offsetPosition, 3);
        Handles.Label(offsetPosition, "Offset");
        if (launcher.projectile != null)
        {
            var endPosition = offsetPosition +
                (launcher.transform.forward *
                launcher.velocity /
                launcher.projectile.mass);
            using (new Handles.DrawingScope(Color.yellow))
            {
                Handles.DrawDottedLine(offsetPosition, endPosition, 3);
                Gizmos.DrawWireSphere(endPosition, 0.125f);
                Handles.Label(endPosition, "Estimated Position");
            }
        }
    }

    void OnSceneGUI()
    {
        var launcher = target as Launcher;
        var transform = launcher.transform;

            using (var cc = new EditorGUI.ChangeCheckScope())
            {
               var newOffset = transform.InverseTransformPoint(

               Handles.PositionHandle(
                   transform.TransformPoint(launcher.offset),
                   transform.rotation));

               if(cc.changed)
               {
                   Undo.RecordObject(launcher, "Offset Change");
                   launcher.offset = newOffset;
               }
           }

        Handles.BeginGUI();
        var rectMin = Camera.current.WorldToScreenPoint(
            launcher.transform.position +
            launcher.offset);
        var rect = new Rect();
        rect.xMin = rectMin.x;
        rect.yMin = SceneView.currentDrawingSceneView.position.height -
            rectMin.y;
        rect.width = 64;
        rect.height = 18;
        GUILayout.BeginArea(rect);
        using (new EditorGUI.DisabledGroupScope(!Application.isPlaying))
        {
            if (GUILayout.Button("Fire"))
                launcher.Fire();
        }
        GUILayout.EndArea();
        Handles.EndGUI();
    }
}
}
如果你在你的编辑器中试一下,你会发现位置估计不是很准确!让我们改变计算方式,将重力考虑在内,并使用Handles.DrawAAPolyLine和Gizmos.DrawWireSphere通过一秒钟的飞行时间轨迹绘制一条曲线路径。如果我们使用Handles.DrawScope来改变widgets的颜色,我们就不需要担心在方法完成后将其设置回之前的handle颜色。
[DrawGizmo(GizmoType.Pickable | GizmoType.Selected)]
static void DrawGizmosSelected(Launcher launcher, GizmoType gizmoType)
{
{
    var offsetPosition = launcher.transform.TransformPoint(launcher.offset);
    Handles.DrawDottedLine(launcher.transform.position, offsetPosition, 3);
    Handles.Label(offsetPosition, "Offset");
    if (launcher.projectile != null)
    {
        var positions = new List<Vector3>();
        var velocity = launcher.transform.forward *
            launcher.velocity /
            launcher.projectile.mass;
        var position = offsetPosition;
        var physicsStep = 0.1f;
        for (var i = 0f; i <= 1f; i += physicsStep)
        {
            positions.Add(position);
            position += velocity * physicsStep;
            velocity += Physics.gravity * physicsStep;
        }
        using (new Handles.DrawingScope(Color.yellow))
        {
            Handles.DrawAAPolyLine(positions.ToArray());
            Gizmos.DrawWireSphere(positions[positions.Count - 1], 0.125f);
            Handles.Label(positions[positions.Count - 1], "Estimated Position (1 sec)");
        }
    }
}
}
总结
这些都是一些非常简单的方法,你可以为其他游戏设计师和你自己改善编辑器的体验。使用Editor.OnSceneGUI,你有能力创建任何类型的编辑器工具,就在场景视图里面。熟悉Handles类和它能为你提供的所有功能绝对是值得的,它能帮助你为自己和你的团队顺利完成游戏设计和开发过程。
6.创建一个Spline工具
本章节中的主要内容包括:
- 如何在场景视图中使用高度小组件
- 如何使用SerializedProperty和SerializedObject实例来操作组件
- 如何实现一个自定义的 Inspector GUI
- 如何响应、拦截和使用GUI事件
- 如何查询编辑器的内部状态以自定义工具行为
创建组件
如果我们创建一个接口来指定我们的Spline工具的API,我们就可以用这个接口来代替具体的类,这样我们就可以在不同的实现之间进行切换,并与未来可能到来的任何其他系统进行集成,只要它们也使用这个接口。
这个接口规范包含了适用于大多数spline算法的通用方法。它包含了创建和调整spline的方法,以及查询spline不同信息的方法。
Spline接口 (ISpline.cs)
/// <summary>
/// A interface for general spline data.
/// NB: - All Vector3 arguments and Vector3 return values are in world space.
///     - All t arguments specify a uniform position along the spline, apart
///       from the GetNonUniformPoint method.
/// </summary>
public interface ISpline
{
    Vector3 GetNonUniformPoint(float t);
    Vector3 GetPoint(float t);


    Vector3 GetLeft(float t);
    Vector3 GetRight(float t);
    Vector3 GetUp(float t);
    Vector3 GetDown(float t);
    Vector3 GetForward(float t);
    Vector3 GetBackward(float t);


    float GetLength(float stepSize);


    Vector3 GetControlPoint(int index);
    void SetControlPoint(int index, Vector3 position);
    void InsertControlPoint(int index, Vector3 position);
    void RemoveControlPoint(int index);


    Vector3 GetDistance(float distance);
    Vector3 FindClosest(Vector3 worldPoint);


    int ControlPointCount { get; }
}
一个空类 (SplineComponent.cs)
如果我们使用该类的默认实现,我们将得到以下类。它本身什么都不做,但给我们提供了存根来输入所有满足ISpline接口所需的方法。
public class SplineComponent : MonoBehaviour, ISpline
{
    public int ControlPointCount { get { throw new System.NotImplementedException(); } }


    public Vector3 FindClosest(Vector3 worldPoint)
    {
        throw new System.NotImplementedException();
    }


    public Vector3 GetBackward(float t)
    {
        throw new System.NotImplementedException();
    }


    public Vector3 GetControlPoint(int index)
    {
        throw new System.NotImplementedException();
    }


    public Vector3 GetDistance(float distance)
    {
        throw new System.NotImplementedException();
    }


    public Vector3 GetDown(float t)
    {
        throw new System.NotImplementedException();
    }


    public Vector3 GetForward(float t)
    {
        throw new System.NotImplementedException();
    }


    public Vector3 GetLeft(float t)
    {
        throw new System.NotImplementedException();
    }


    public float GetLength(float stepSize)
    {
        throw new System.NotImplementedException();
    }


    public Vector3 GetNonUniformPoint(float t)
    {
        throw new System.NotImplementedException();
    }


    public Vector3 GetPoint(float t)
    {
        throw new System.NotImplementedException();
    }


    public Vector3 GetRight(float t)
    {
        throw new System.NotImplementedException();
    }


    public Vector3 GetUp(float t)
    {
        throw new System.NotImplementedException();
    }


    public void InsertControlPoint(int index, Vector3 position)
    {
        throw new System.NotImplementedException();
    }


    public void RemoveControlPoint(int index)
    {
        throw new System.NotImplementedException();
    }


    public void SetControlPoint(int index, Vector3 position)
    {
        throw new System.NotImplementedException();
    }
}
内插器(The Interpolator)
这是一个百叶窗spline插值函数,它需要4个向量(a和b是控制点,b和c是起点和终点)和一个u参数,用于指定插值位置。它需要4个向量(a和b是控制点,b和c是起点和终点)和一个u参数,它指定了插值位置。
    internal static Vector3 Interpolate(Vector3 a, Vector3 b, Vector3 c, Vector3 d, float u)
    {
        return (
            0.5f *
            (
                (-a + 3f * b - 3f * c + d) *
                (u * u * u) +
                (2f * a - 5f * b + 4f * c - d) *
                (u * u) +
                (-a + c) *
                u + 2f * b
            )
        );
    }
数据
我们需要一些字段来存储我们的Interpolate函数使用的数据。闭合字段指定了spline是否应该形成闭合循环,点列表将包含我们的控制点,这些点指定了spline的形状,最后长度是一个可空的浮点数,一旦计算出spline的长度,我们就可以在这里存储它。
    public bool closed = false;
    public List<Vector3> points = new List<Vector3>();
    public float? length;
现在我们可以填入接口所需的一些方法的主体。
    public int ControlPointCount => points.Count;


    public Vector3 GetNonUniformPoint(float t)
    {
        switch (points.Count)
        {
            case 0:
                return Vector3.zero;
            case 1:
                return transform.TransformPoint(points[0]);
            case 2:
                return transform.TransformPoint(Vector3.Lerp(points[0], points[1], t));
            case 3:
                return transform.TransformPoint(points[1]);
            default:
                return Hermite(t);
        }
    }

    public void InsertControlPoint(int index, Vector3 position)
    {
        ResetIndex();
        if (index >= points.Count)
            points.Add(position);
        else
            points.Insert(index, position);
    }


    public void RemoveControlPoint(int index)
    {
        ResetIndex();
        points.RemoveAt(index);
    }


    public Vector3 GetControlPoint(int index)
    {
        return points[index];
    }


    public void SetControlPoint(int index, Vector3 position)
    {
        ResetIndex();
        points[index] = position;
    }
这个函数是沿着spline查找正确的位置控制点,然后执行并返回插值的世界位置。
    Vector3 Hermite(float t)
    {
        var count = points.Count - (closed ? 0 : 3);
        var i = Mathf.Min(Mathf.FloorToInt(t * (float)count), count - 1);
        var u = t * (float)count - (float)i;
        var a = GetPointByIndex(i);
        var b = GetPointByIndex(i + 1);
        var c = GetPointByIndex(i + 2);
        var d = GetPointByIndex(i + 3);
        return transform.TransformPoint(Interpolate(a, b, c, d, u));
    }

    Vector3 GetPointByIndex(int i)
    {
        if (i < 0) i += points.Count;
        return points[i % points.Count];
    }
如何沿spline获取均匀点?(SplineIndex.cs)
如果我们看一下接口文档,你会注意到几乎所有的查询方法都会返回一个沿spline的统一位置。这并不直接,因为我们的spline是由任意控制点组成的,这些点之间的距离可以是任意的。除此之外,我们的插值算法的性质意味着我们不能简单地存储控制点之间的距离,并使用它来修改t参数。
因此,我们创建了一个沿spline离散、统一位置的索引。然后,这个索引被用来提供界面所假设的均匀位置。
public class SplineIndex
{
    public Vector3[] linearPoints;
    SplineComponent spline;


    public int ControlPointCount => spline.ControlPointCount;


    public SplineIndex(SplineComponent spline)
    {
        this.spline = spline;
        ReIndex();
    }


    public void ReIndex()
    {
        var searchStepSize = 0.00001f;
        var length = spline.GetLength(searchStepSize);
        var indexSize = Mathf.FloorToInt(length * 2);
        var _linearPoints = new List<Vector3>(indexSize);
        var t = 0f;


        var linearDistanceStep = length / 1024;
        var linearDistanceStep2 = Mathf.Pow(linearDistanceStep, 2);


        var start = spline.GetNonUniformPoint(0);
        _linearPoints.Add(start);
        while (t <= 1f)
        {
            var current = spline.GetNonUniformPoint(t);
            while ((current - start).sqrMagnitude <= linearDistanceStep2)
            {
                t += searchStepSize;
                current = spline.GetNonUniformPoint(t);
            }
            start = current;
            _linearPoints.Add(current);
        }
        linearPoints = _linearPoints.ToArray();
    }


    public Vector3 GetPoint(float t)
    {
        var sections = linearPoints.Length - (spline.closed ? 0 : 3);
        var i = Mathf.Min(Mathf.FloorToInt(t * (float)sections), sections - 1);
        var count = linearPoints.Length;
        if (i < 0) i += count;
        var u = t * (float)sections - (float)i;
        var a = linearPoints[(i + 0) % count];
        var b = linearPoints[(i + 1) % count];
        var c = linearPoints[(i + 2) % count];
        var d = linearPoints[(i + 3) % count];
        return SplineComponent.Interpolate(a, b, c, d, u);
    }
}
在Spline中添加懒惰索引
我们所创建的索引创建成本很高,而且(相对而言)占用了相当多的内存。如果用户不需要这个索引,我们应该避免创建它。这可以通过使用一个私有属性来实现,它只会在需要的时候创建一个索引,然后再重新使用这个索引。我们还提供了一个重置索引的方法,这样当控制点或其他参数改变时,索引将被重建。
现在索引允许我们在接口所需的GetPoint方法中添加一个体,并返回一个沿spline的统一位置。
    /// <summary>
    /// Index is used to provide uniform point searching.
    /// </summary>
    SplineIndex uniformIndex;
    SplineIndex Index
    {
        get
        {
            if (uniformIndex == null) uniformIndex = new SplineIndex(this);
            return uniformIndex;
        }
    }

    public void ResetIndex()
    {
        uniformIndex = null;
        length = null;
    }

    public Vector3 GetPoint(float t) => Index.GetPoint(t);
添加查询方法
现在我们已经有了GetPoint的实现,我们可以构造其余的查询方法。
    public Vector3 GetRight(float t)
    {
        var A = GetPoint(t - 0.001f);
        var B = GetPoint(t + 0.001f);
        var delta = (B - A);
        return new Vector3(-delta.z, 0, delta.x).normalized;
    }


    public Vector3 GetForward(float t)
    {
        var A = GetPoint(t - 0.001f);
        var B = GetPoint(t + 0.001f);
        return (B - A).normalized;
    }


    public Vector3 GetUp(float t)
    {
        var A = GetPoint(t - 0.001f);
        var B = GetPoint(t + 0.001f);
        var delta = (B - A).normalized;
        return Vector3.Cross(delta, GetRight(t));
    }


    public Vector3 GetPoint(float t) => Index.GetPoint(t);


    public Vector3 GetLeft(float t) => -GetRight(t);


    public Vector3 GetDown(float t) => -GetUp(t);


    public Vector3 GetBackward(float t) => -GetForward(t);
出于同样的原因,我们需要构建一个索引,我们也需要沿着spline迭代以获得总长度的估计。步长参数控制了估计的精确程度。它的默认值是0.001f,这对大多数情况来说是可以接受的。
    public float GetLength(float step = 0.001f)
    {
        var D = 0f;
        var A = GetNonUniformPoint(0);
        for (var t = 0f; t < 1f; t += step)
        {
            var B = GetNonUniformPoint(t);
            var delta = (B - A);
            D += delta.magnitude;
            A = B;
        }
        return D;
    }

    public Vector3 GetDistance(float distance)
    {
        if (length == null) length = GetLength();
        return uniformIndex.GetPoint(distance / length.Value);
    }
The FindClosest method returns the approximate closest position on the spline to a world point. Due to the nature of splines, this solution cannot be analytical and we must create a numerical solution to solve the problem. The spline is divided into 1024 points and we choose the closest by comparing square of the distance to the world point.
FindClosest方法返回spline上离世界点最近的位置。由于spline的性质,这个解决方案不能是分析性的,我们必须创建一个数值解决方案来解决问题。spline被分为1024个点,我们通过比较与世界点距离的平方来选择最近的点。
    public Vector3 FindClosest(Vector3 worldPoint)
    {
        var smallestDelta = float.MaxValue;
        var step = 1f / 1024;
        var closestPoint = Vector3.zero;
        for (var i = 0; i <= 1024; i++)
        {
            var p = GetPoint(i * step);
            var delta = (worldPoint - p).sqrMagnitude;
            if (delta < smallestDelta)
            {
                closestPoint = p;
                smallestDelta = delta;
            }
        }
        return closestPoint;
    }
增加编辑助手方法
编辑器提供了Reset方法,当组件第一次被添加到gameobject时,该方法用于设置组件的默认值。添加4个默认点,因为这是我们实现spline的最小要求。
    void Reset()
    {
        points = new List<Vector3>() {
            Vector3.forward * 3,
            Vector3.forward * 6,
            Vector3.forward * 9,
            Vector3.forward * 12
        };
    }
每当组件上的值被改变时,编辑器就会调用OnValidate。如果我们的组件上有一个活动的索引,我们就会重新索引spline,这样索引就会建立在更改后的值上。
    void OnValidate()
    {
        if (uniformIndex != null) uniformIndex.ReIndex();
    }
创建编辑器
SplineComponent工作得很好,但要在Unity编辑器中有效地使用它,我们需要让它变得更加用户友好。
一个自定义的Inspector(Editor/SplineComponentEditor.cs)
第一步是自定义inspector。这是通过OnInspectorGUI方法在Editor类中创建的。下面的方法为组件字段设置了widget,并为我们稍后创建的一些有用的实用方法添加了一些按钮。
[CustomEditor(typeof(SplineComponent))]
public class SplineComponentEditor : Editor
{
    public override void OnInspectorGUI()
    {
        EditorGUILayout.HelpBox("Hold Shift and click to append and insert curve points. Backspace to delete points.", MessageType.Info);
        var spline = target as SplineComponent;
        GUILayout.BeginHorizontal();
        var closed = GUILayout.Toggle(spline.closed, "Closed", "button");
        if (spline.closed != closed)
        {
            spline.closed = closed;
            spline.ResetIndex();
        }
        if (GUILayout.Button("Flatten Y Axis"))
        {
            Undo.RecordObject(target, "Flatten Y Axis");
            //TODO: Flatten(spline.points);
            spline.ResetIndex();
        }
        if (GUILayout.Button("Center around Origin"))
        {
            Undo.RecordObject(target, "Center around Origin");
            //TODO: CenterAroundOrigin(spline.points);
            spline.ResetIndex();
        }
        GUILayout.EndHorizontal();
    }
}
绘制Gizmos
Gizmo是场景视图里面的视觉效果,可以帮助我们识别组件,尤其是它没有可渲染的几何体。有3个函数,主要的绘制函数(DrawGizmo)和其他2个具有DrawGizmo属性的函数。这允许我们在hierarchy中选择spline组件时绘制一个高分辨率的gizmo,而在其他时候绘制一个低分辨率的gizmo。
    [DrawGizmo(GizmoType.NonSelected)]
    static void DrawGizmosLoRes(SplineComponent spline, GizmoType gizmoType)
    {
        Gizmos.color = Color.white;
        DrawGizmo(spline, 64);
    }

    [DrawGizmo(GizmoType.Selected)]
    static void DrawGizmosHiRes(SplineComponent spline, GizmoType gizmoType)
    {
        Gizmos.color = Color.white;
        DrawGizmo(spline, 1024);
    }

    static void DrawGizmo(SplineComponent spline, int stepCount)
    {
        if (spline.points.Count > 0)
        {
            var P = 0f;
            var start = spline.GetNonUniformPoint(0);
            var step = 1f / stepCount;
            do
            {
                P += step;
                var here = spline.GetNonUniformPoint(P);
                Gizmos.DrawLine(start, here);
                start = here;
            } while (P + step <= 1);
        }
    }
场景视图控制
你会注意到我们没有为spline控制点创建inspector字段,这是因为我们要通过场景视图管理控制点。
这两个字段存储了当前选中的控制点的索引,如果我们选择删除一个控制点,我们也会存储该控制点的索引。
int hotIndex = -1;
int removeIndex = -1;
当组件在hierarchy中被选中时,OnSceneGUI方法允许我们在场景视图内绘制部件。如果鼠标光标没有在场景视图上,我们提前退出该方法,以避免潜在的昂贵的绘制,当处于播放模式时,这可能真的会拖慢编辑器的速度。
如果用户按住shift键,我们会进行一些特殊的可视化操作,因为我们要使用shift+左键事件来添加控制点。
    void OnSceneGUI()
    {
        var spline = target as SplineComponent;


        var e = Event.current;
        GUIUtility.GetControlID(FocusType.Passive);


        var mousePos = (Vector2)Event.current.mousePosition;
        var view = SceneView.currentDrawingSceneView.camera.ScreenToViewportPoint(Event.current.mousePosition);
        var mouseIsOutside = view.x < 0 || view.x > 1 || view.y < 0 || view.y > 1;
        if (mouseIsOutside) return;

        var points = serializedObject.FindProperty("points");
        if (Event.current.shift)
        {
            if (spline.closed)
                ShowClosestPointOnClosedSpline(points);
            else
                ShowClosestPointOnOpenSpline(points);
        }
在序列化属性上循环
当修改控制点时,使用SerializedProperty代替直接修改点列表,或者使用组件上的相应方法。这样做是为了使Undo/Redo功能自动应用到整个点列表,包括位置值。要在场景视图中使用控制点,必须使用TransformPoint方法将其转换为世界坐标。
        for (int i = 0; i < spline.points.Count; i++)
        {
            var prop = points.GetArrayElementAtIndex(i);
            var point = prop.vector3Value;
            var wp = spline.transform.TransformPoint(point);
为选定的控制点绘制控制部件
如果当前控制点是 “热的”(被用户选择),允许修改位置的Handles就会被绘制出来。我们只有在Handles被移动的情况下才会更新属性的位置值。
命令事件也只应用于热控制点,为了便于阅读,这些事件被放到HandleCommands方法中。
            if (hotIndex == i)
            {
                var newWp = Handles.PositionHandle(wp, Tools.pivotRotation == PivotRotation.Global ? Quaternion.identity : spline.transform.rotation);
                var delta = spline.transform.InverseTransformDirection(newWp - wp);
                if (delta.sqrMagnitude > 0)
                {
                    prop.vector3Value = point + delta;
                    spline.ResetIndex();
                }
                HandleCommands(wp);
            }
允许选择控制点
用户如何选择要编辑的控制点?Handles.Button方法的工作原理就像普通的IMGUI Button方法一样,但是它允许我们使用一个球体作为按钮视觉,而不是GUI按钮。这对于在场景视图中可视化和选择点是完美的。我们使用GetHandleSize方法使按钮球体在整个场景中以一致的大小绘制,无论摄像机的位置如何。
            Handles.color = i == 0 | i == spline.points.Count - 1 ? Color.red : Color.white;
            var buttonSize = HandleUtility.GetHandleSize(wp) * 0.1f;
            if (Handles.Button(wp, Quaternion.identity, buttonSize, buttonSize, Handles.SphereHandleCap))
                hotIndex = i;
我们还可以使用Handles.Label来绘制控制点的索引。这是一个很好的主意,可以帮助你在将来调试问题。
            var v = SceneView.currentDrawingSceneView.camera.transform.InverseTransformPoint(wp);
            var labelIsOutside = v.z < 0;
            if (!labelIsOutside) Handles.Label(wp, i.ToString());

        }
进行最后的删除
还记得我们创建的removeIndex字段吗?这就是我们使用该字段的值来删除一个控制点的地方。这发生在OnSceneGUI方法的结尾,这样下次调用该方法时,它将有一个正确的控制点列表。这也避免了在其他方法调用过程中修改点的列表,这可能会在迭代改变的列表时引起问题。
        if (removeIndex >= 0 && points.arraySize > 4)
        {
            points.DeleteArrayElementAtIndex(removeIndex);
            spline.ResetIndex();
        }
记得把removeIndex设置为-1,否则我们每隔一帧就会删除一个点!
另外,要持久化修改,我们必须调用ApplyModifiedProperties。
        removeIndex = -1;
        serializedObject.ApplyModifiedProperties();


    }
拦截和处理键盘命令
这就是前面提到的处理命令的方法,这些命令是针对热控制点的。第一个命令是FrameSelected,当你在场景视图中按下F键时就会发生。我们在这里拦截了这个命令,这样我们就不会框住spline组件所连接的游戏对象,而是框住热控制点。
第二条命令拦截Backspace键,通过将热控制点的索引分配给removeIndex字段,让它被计划删除。
    void HandleCommands(Vector3 wp)
    {
        if (Event.current.type == EventType.ExecuteCommand)
        {
            if (Event.current.commandName == "FrameSelected")
            {
                SceneView.currentDrawingSceneView.Frame(new Bounds(wp, Vector3.one * 10), false);
                Event.current.Use();
            }
        }
        if (Event.current.type == EventType.KeyDown)
        {
            if (Event.current.keyCode == KeyCode.Backspace)
            {
                removeIndex = hotIndex;
                Event.current.Use();
            }
        }
    }
允许添加和插入控制点
These are the two functions which are called from OnSceneGUI when the user has the shift key pressed. They have slightly different behaviour depending on whether the spline is closed or open, so for clarity this is split into two different methods.
Both methods have similar functionality. They draw a line from the mouse cursor to the intersection point on the spline where the new control point will be inserted. In the case of an open spline, they also show a line when extending the spline from one of the end points.
They then check for the left click of the mouse button and if clicked use the SerializedProperty API to insert an item into the list of points, and then set it’s value to the new control point position.
As both methods have the common function of searching for a closest point, this function is split out into a separate method.
当用户按下shift键时,OnSceneGUI会调用这两个函数。根据spline是闭合还是打开,它们的行为略有不同,所以为了清楚起见,将其分成两个不同的方法。
这两种方法的功能相似。它们从鼠标光标画一条线到spline上的交叉点,在那里将插入新的控制点。在开放spline的情况下,当从其中一个端点延伸spline时,它们也会显示一条线。
然后,它们会检查鼠标按钮的左键点击,如果点击了,则使用SerializedProperty API将一个项目插入到点的列表中,然后将它的值设置为新的控制点位置。
由于这两种方法的共同功能都是寻找一个最近的点,所以这个功能被拆分出来,成为一个单独的方法。
    void ShowClosestPointOnClosedSpline(SerializedProperty points)
    {
        var spline = target as SplineComponent;
        var plane = new Plane(spline.transform.up, spline.transform.position);
        var ray = HandleUtility.GUIPointToWorldRay(Event.current.mousePosition);
        float center;
        if (plane.Raycast(ray, out center))
        {
            var hit = ray.origin + ray.direction * center;
            Handles.DrawWireDisc(hit, spline.transform.up, 5);
            var p = SearchForClosestPoint(Event.current.mousePosition);
            var sp = spline.GetNonUniformPoint(p);
            Handles.DrawLine(hit, sp);


            if (Event.current.type == EventType.MouseDown && Event.current.button == 0 && Event.current.shift)
            {
                var i = (Mathf.FloorToInt(p * spline.points.Count) + 2) % spline.points.Count;
                points.InsertArrayElementAtIndex(i);
                points.GetArrayElementAtIndex(i).vector3Value = spline.transform.InverseTransformPoint(sp);
                serializedObject.ApplyModifiedProperties();
                hotIndex = i;
            }
        }
    }


    void ShowClosestPointOnOpenSpline(SerializedProperty points)
    {
        var spline = target as SplineComponent;
        var plane = new Plane(spline.transform.up, spline.transform.position);
        var ray = HandleUtility.GUIPointToWorldRay(Event.current.mousePosition);
        float center;
        if (plane.Raycast(ray, out center))
        {
            var hit = ray.origin + ray.direction * center;
            var discSize = HandleUtility.GetHandleSize(hit);
            Handles.DrawWireDisc(hit, spline.transform.up, discSize);
            var p = SearchForClosestPoint(Event.current.mousePosition);


            if ((hit - spline.GetNonUniformPoint(0)).sqrMagnitude < 25) p = 0;
            if ((hit - spline.GetNonUniformPoint(1)).sqrMagnitude < 25) p = 1;


            var sp = spline.GetNonUniformPoint(p);


            var extend = Mathf.Approximately(p, 0) || Mathf.Approximately(p, 1);


            Handles.color = extend ? Color.red : Color.white;
            Handles.DrawLine(hit, sp);
            Handles.color = Color.white;


            var i = 1 + Mathf.FloorToInt(p * (spline.points.Count - 3));


            if (Event.current.type == EventType.MouseDown && Event.current.button == 0 && Event.current.shift)
            {
                if (extend)
                {
                    if (i == spline.points.Count - 2) i++;
                    points.InsertArrayElementAtIndex(i);
                    points.GetArrayElementAtIndex(i).vector3Value = spline.transform.InverseTransformPoint(hit);
                    hotIndex = i;
                }
                else
                {
                    i++;
                    points.InsertArrayElementAtIndex(i);
                    points.GetArrayElementAtIndex(i).vector3Value = spline.transform.InverseTransformPoint(sp);
                    hotIndex = i;
                }
                serializedObject.ApplyModifiedProperties();
            }
        }
    }


    float SearchForClosestPoint(Vector2 screenPoint, float A = 0f, float B = 1f, float steps = 1000)
    {
        var spline = target as SplineComponent;
        var smallestDelta = float.MaxValue;
        var step = (B - A) / steps;
        var closestI = A;
        for (var i = 0; i <= steps; i++)
        {
            var p = spline.GetNonUniformPoint(i * step);
            var gp = HandleUtility.WorldToGUIPoint(p);
            var delta = (screenPoint - gp).sqrMagnitude;
            if (delta < smallestDelta)
            {
                closestI = i;
                smallestDelta = delta;
            }
        }
        return closestI * step;
    }
添加实用方法
最后的任务是创建由自定义inspector按钮调用的实用方法。第一个方法将所有控制点的y位置平坦化。第二个方法是重新定位所有控制点,使GameObjects的变换位于所有控制点的中心。
    void Flatten(List<Vector3> points)
    {
        for (int i = 0; i < points.Count; i++)
        {
            points[i] = Vector3.Scale(points[i], new Vector3(1, 0, 1));
        }
    }


    void CenterAroundOrigin(List<Vector3> points)
    {
        var center = Vector3.zero;
        for (int i = 0; i < points.Count; i++)
        {
            center += points[i];
        }
        center /= points.Count;
        for (int i = 0; i < points.Count; i++)
        {
            points[i] -= center;
        }
    }
}
7.使用IK(Inverse Kinematics,逆运动学)
逆运动学(IK)是计算一组关节的旋转的过程,以使最终关节到达某个位置。例如,IK可以用来计算肩部、肘部和手腕的旋转,这些旋转是手指到达空间中某一点所需要的。
设置一个测试场景进行开发
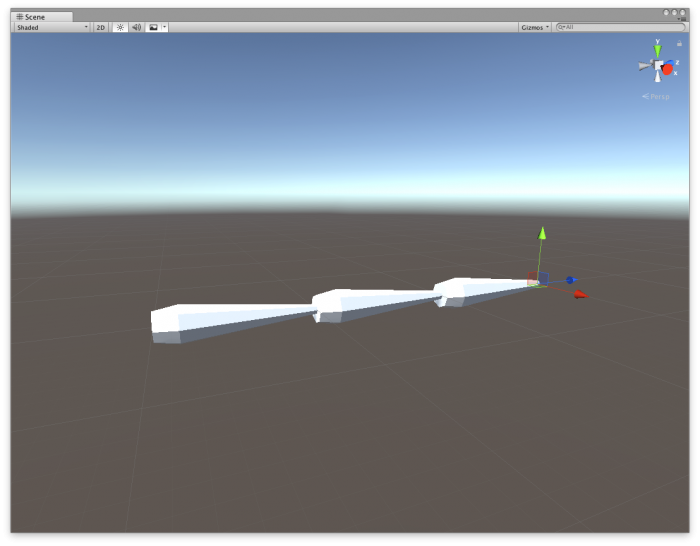
需要一个手臂段的模型,该模型的设置是forward轴与Unity的forward轴(x:0,y:0,z:1)相匹配,支点设置在关节应该围绕的同一位置旋转。

创建一个空的游戏对象,它将是你的手臂的根。创建第二个空的子游戏对象,作为主枢轴。然后,连接三个段来创建一个手臂。最后,在层次结构的最后创建一个空的GameObject,并将其命名为 “Tip”。这个位置就是你要匹配目标位置的点。
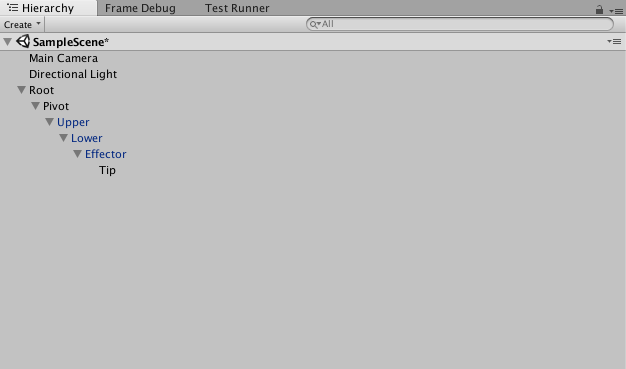
使用 “场景 “视图中的位置手柄,布置你的GameObjects,使它们类似于一个机械臂,类似于下面的截图。请注意,GameObject Tip被定位在最后一段的最末端。
敲代码环节
我们的IK算法将使用余弦定律和一点点作弊来计算出最终的效果器角度。效果器是Tip的父变换。枢轴是根节点之后的第一个变换。这样我们的链子中间就剩下两个变换。如果我们手动定位枢轴和效果器,我们可以使用余弦定律来计算中间两个变换的正确旋转。
Monobehaviour 类
创建一个名为SimpleIKSolver.cs的新脚本。我们需要添加持有变换链所需的字段,以及执行计算所需的数据。
public class SimpleIKSolver : MonoBehaviour
{

    public Transform pivot, upper, lower, effector, tip;
    public Vector3 target = Vector3.forward;
    public Vector3 normal = Vector3.up;


    float upperLength, lowerLength, effectorLength, pivotLength;
    Vector3 effectorTarget, tipTarget;
}
这个行为类应该被分配给pivot gameobject。但在这之前,我们将创建一个方法来使组件检查器的设置不那么痛苦!将下面的方法添加到你的类中,然后将其作为组件添加到pivot gameobject中。
void Reset()
{
{
    pivot = transform;
    try
    {
        upper = pivot.GetChild(0);
        lower = upper.GetChild(0);
        effector = lower.GetChild(0);
        tip = effector.GetChild(0);
    }
    catch (UnityException)
    {
        Debug.Log("Could not find required transforms, please assign manually.");
    }
}
当组件第一次连接到游戏对象上时,这个方法会自动运行,它试图找到所需的游戏对象,并将它们分配到检查器中的正确插槽中。它试图找到所需的gameobjects,并将它们分配到检查器中的正确插槽中。然而,如果它找不到游戏对象,它将打印出一条有用的信息。
现在我们需要收集一些数据,用于我们的三角计算。我们需要的数据是每个段的长度。我们应该在运行时在Awake方法中做这个工作,这样我们就知道它对于当前的层次结构的设置总是正确的。
void Awake()
{
    upperLength = (lower.position - upper.position).magnitude;
    lowerLength = (effector.position - lower.position).magnitude;
    effectorLength = (tip.position - effector.position).magnitude;
    pivotLength = (upper.position - pivot.position).magnitude;
}
接下来,Update函数要计算目标位置,并调用尚未编写的Solve方法。
void Update()
{
    tipTarget = target;
    effectorTarget = target + normal * effectorLength;
    Solve();
}
这时我们开始有点作弊了。我们直接使用法线字段设置最终段的方向。这个字段可以设置为一个恒定值,也可以根据碰撞法线或其他机制动态改变。由于我们知道最终段的方向,我们就可以利用已知的方向和效果器的长度,计算效果器变换的目标位置。
IK算法
下面列出完整的IK算法,方便大家复制/粘贴。
我们知道了最后一个关节的方向,还剩下三个关节需要解决。让我们再作弊,旋转枢轴变换,使其直接看向tipTarget。
var pivotDir = effectorTarget - pivot.position;
pivot.rotation = Quaternion.LookRotation(pivotDir);
剩下的两个旋转我们需要计算,幸运的是这是一个众所周知的问题,我们可以用三角法(余弦定律)解决。变量’a’、’b’和’c’是变换链形成的三角形的长度。
    var upperToTarget = (effectorTarget - upper.position);
    var a = upperLength;
    var b = lowerLength;
    var c = upperToTarget.magnitude;
然后我们可以应用余弦定律来计算abc三角形的内角。
var B = Mathf.Acos((c c + a a - b b) / (2 c a)) Mathf.Rad2Deg;
var C = Mathf.Acos((a a + b b - c c) / (2 a b)) Mathf.Rad2Deg;
注意,我们需要检查C是一个有效的数字,因为有时我们可以用我们的关节方向形成一个不可能解决的三角形。如果C变量是确定的,下一步是将角度转换为我们可以应用于我们的段的旋转。此外,由于我们正在处理局部旋转,我们围绕全局向量(Vector3.right)进行旋转。
if (!float.IsNaN(C))
{
{
    var upperRotation = Quaternion.AngleAxis((-B), Vector3.right);
    upper.localRotation = upperRotation;
    var lowerRotation = Quaternion.AngleAxis(180 - C, Vector3.right);
    lower.localRotation = lowerRotation;
}
最后,我们将最后一段(效应器)定向到指向tipTarget。
var effectorRotation = Quaternion.LookRotation(tipTarget - effector.position);
effector.rotation = effectorRotation;
完整的Solve方法:
void Solve()
{
    var pivotDir = effectorTarget - pivot.position;
    pivot.rotation = Quaternion.LookRotation(pivotDir);


    var upperToTarget = (effectorTarget - upper.position);
    var a = upperLength;
    var b = lowerLength;
    var c = upperToTarget.magnitude;


    var B = Mathf.Acos((c * c + a * a - b * b) / (2 * c * a)) * Mathf.Rad2Deg;
    var C = Mathf.Acos((a * a + b * b - c * c) / (2 * a * b)) * Mathf.Rad2Deg;


    if (!float.IsNaN(C))
    {
        var upperRotation = Quaternion.AngleAxis((-B), Vector3.right);
        upper.localRotation = upperRotation;
        var lowerRotation = Quaternion.AngleAxis(180 - C, Vector3.right);
        lower.localRotation = lowerRotation;
    }
    var effectorRotation = Quaternion.LookRotation(tipTarget - effector.position);
    effector.rotation = effectorRotation;
}
此时,IK解已经完成了,应该可以在你的编辑器中使用。但它目前还不太容易调试或使用,所以我们需要添加一些编辑器控件,让我们测试系统是否按照预期工作。
编辑器的脚本编写
在Editor文件夹中创建一个新的脚本,称它为SimpleIKSolverEditor.cs。编辑脚本并粘贴这段代码。
[CustomEditor(typeof(SimpleIKSolver))]
public class SimpleIKSolverEditor : Editor
{
}
First, we will modify the inspector to warn us when any of the transforms required for our solver are missing. If any of the transforms are null, we will display an error message directly in the inspector. Then, we draw the default inspector as the default functionality is good enough for this component.
现在,我们准备开始自定义编辑器了
自定义Inspector
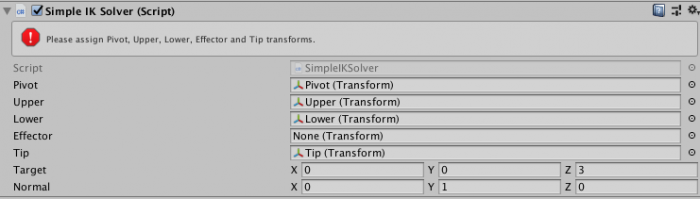
首先,我们将修改Inspector,当我们的求解器所需的任何变换丢失时,我们将发出警告。如果任何一个变换是空的,我们将直接在Inspector中显示一个错误信息。然后,我们画出默认的Inspector,因为默认的功能对这个组件来说已经足够好了。
public override void OnInspectorGUI()
{
    var s = target as SimpleIKSolver;
    if (s.pivot == null || s.upper == null || s.lower == null | s.effector == null || s.tip == null)
        EditorGUILayout.HelpBox("Please assign Pivot, Upper, Lower, Effector and Tip transforms.", MessageType.Error);
    base.OnInspectorGUI();
}
Second, we are going to write a gizmo function for showing the same error information from the inspector, in the sceneview. We can also draw some helpful information, showing the distance from our target position to the tip position. The default labels in the sceneview are a bit difficult to see, so create an guistyle which we can use to make them more visible.
定制Gizmo
其次,我们要写一个小工具函数,用于在场景视图中显示来自Inspector的同样的错误信息,我们还可以绘制一些有用的信息,显示从目标位置到尖端位置的距离。在场景视图中的默认标签有点难看,所以创建一个GUIStyle,我们可以用它来使它们更明显。
static GUIStyle errorBox;


void OnEnable()
{
    errorBox = new GUIStyle(EditorGUIUtility.GetBuiltinSkin(EditorSkin.Scene).box);
    errorBox.normal.textColor = Color.red;
}
这是一个在场景视图中绘制小工具的函数,我们将刚刚创建的GUIStyle传递给Handles.Label方法。如果缺少任何一个变换,我们立即退出该方法,因为进一步的绘制操作都将无法进行。
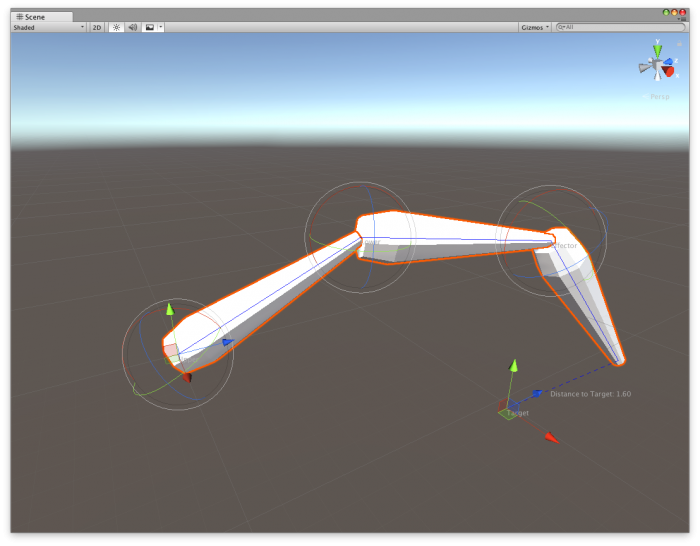
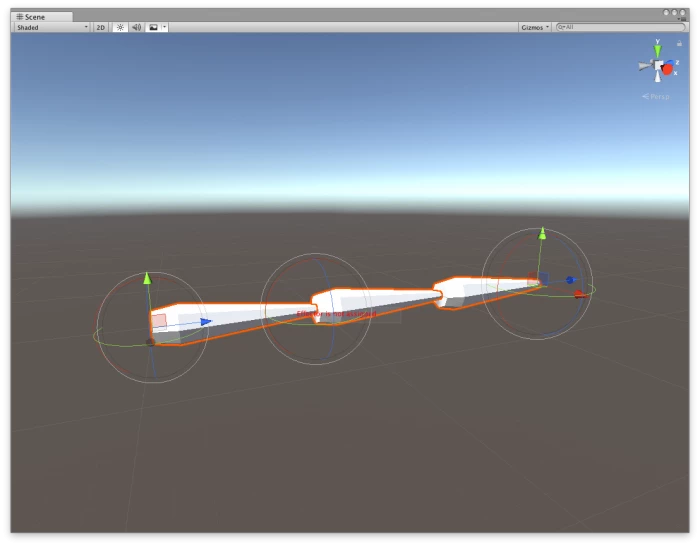
最后,我们绘制一条蓝色的线,显示链中的段,一条虚线显示尖端位置和目标位置之间的三角。
[DrawGizmo(GizmoType.Selected)]
static void OnDrawGizmosSelected(SimpleIKSolver siks, GizmoType gizmoType)
{
    Handles.color = Color.blue;
    if (siks.pivot == null)
    {
        Handles.Label(siks.transform.position, "Pivot is not assigned", errorBox);
        return;
    }
    if (siks.upper == null)
    {
        Handles.Label(siks.pivot.position, "Upper is not assigned", errorBox);
        return;
    }
    if (siks.lower == null)
    {
        Handles.Label(siks.upper.position, "Lower is not assigned", errorBox);
        return;
    }
    if (siks.effector == null)
    {
        Handles.Label(siks.lower.position, "Effector is not assigned", errorBox);
        return;
    }
    if (siks.tip == null)
    {
        Handles.Label(siks.effector.position, "Tip is not assigned", errorBox);
        return;
    }
    Handles.DrawPolyLine(siks.pivot.position, siks.upper.position, siks.lower.position, siks.effector.position, siks.tip.position);
    Handles.DrawDottedLine(siks.tip.position, siks.target, 3);
    Handles.Label(siks.upper.position, "Upper");
    Handles.Label(siks.effector.position, "Effector");
    Handles.Label(siks.lower.position, "Lower");
    Handles.Label(siks.target, "Target");
    var distanceToTarget = Vector3.Distance(siks.target, siks.tip.position);
    var midPoint = Vector3.Lerp(siks.target, siks.tip.position, 0.5f);
    Handles.Label(midPoint, string.Format("Distance to Target: {0:0.00}", distanceToTarget));
}
自定义场景视图
最后两个函数在每个支点画一个旋转句柄,让你可以旋转链中的每个关节,而不必取消选择主支点变换。我们还用一个位置句柄来表示目标位置,用一个旋转句柄来修改法域。

public void OnSceneGUI()
{
{
    var siks = target as SimpleIKSolver;
    RotationHandle(siks.effector);
    RotationHandle(siks.lower);
    RotationHandle(siks.upper);
    siks.target = Handles.PositionHandle(siks.target, Quaternion.identity);
    var normalRotation = Quaternion.LookRotation(Vector3.forward, siks.normal);
    normalRotation = Handles.RotationHandle(normalRotation, siks.tip.position);
    siks.normal = normalRotation * Vector3.up;
}
这个方法将为任何变换绘制一个旋转手柄。我们在上面的上、下和效果器变换中使用它。只有在旋转值被改变的情况下,它才会改变它,这是通过使用BeginChangeCheck和EndChangeCheck方法来检测的。如果它被改变了,我们就记录下变换的状态,这样Undo/Redo系统就会正常工作,然后将新的旋转值分配给transform.rotation属性。
void RotationHandle(Transform transform)
{
    if (transform != null)
    {
        EditorGUI.BeginChangeCheck();
        var rotation = Handles.RotationHandle(transform.rotation, transform.position);
        if (EditorGUI.EndChangeCheck())
        {
            Undo.RecordObject(transform, "Rotate");
            transform.rotation = rotation;
        }
    }
}
现在,我们有了一个简单的IK系统,它有一个漂亮的编辑器界面,可以扩展和使用任何变换链。